
Although not common among household vegetable gardens, sweet potatoes are relatively easy to grow, with drought tolerance and few problems. These native American vegetables also last for months when properly stored and provide high amounts of vitamin A, C, and E, as well as calcium, potassium, and antioxidants. Plus, the entire plant is edible: the leaves make an excellent cooked spinach substitute! If you would like to learn how to grow sweet potatoes, read on for a step-by-step guide.

How to Grow Sweet Potatoes
Unlike potatoes (which belong to an entirely different family), sweet potatoes are not grown from pieces of root, nor are they started from seed. Rather, sweet potato propagation begins with slips or stems grown from a mother root. Slips can be purchased from a supplier or grown from the previous year’s crop.
Sweet potatoes require little care while in the ground. However, after harvest, they require curing, which not only improves their shelf life but makes them sweet. Saving a few of those roots and starting your own slips also takes a bit of effort, though it results in sturdier plants that cost zero dollars.
Planting sweet potatoes in the garden
Sweet potato varieties to grow
As with most vegetables, there are many varieties of sweet potatoes to choose from. In addition to personal preference, take into account available space and season length. Sweet potatoes do not tolerate frost, so if you have short, mild summers, you will want an earlier maturing variety.
- Centennial (90 days, orange)
- O’Henry (90 days, white)
- Yellow Jersey (100 days, white)
- Beauregard (105 days, orange)
- Covington (110 days, orange)
- Garnet (110 days, orange)
- Porto Rico (110 days, orange)
- Jewel (120 days, orange)
- Okinawan (120 days, purple)
Soil preparation
Choose a location for your sweet potato patch that receives at least eight to 10 hours of sunlight each day. As a root vegetable, sweet potatoes grow best in loamy to sandy soil, so if your garden is full of clay, mix in some well-rotted compost or other organic matter. This will also help with harvesting, as digging up sweet potatoes grown in heavy clay soil, as I’ve found, is quite a chore!
Sweet potatoes also prefer slightly acidic soil (pH 6.0-6.5), so it may prove beneficial to test your soil and amend it as necessary to achieve the proper pH.
Sweet potato planting time
Because sweet potatoes do not tolerate frost, it is imperative not to plant out your slips too early – which means you also need to plan your purchase or preparation of slips accordingly. Wait to plant until the soil reaches at least 65 F, or about two weeks after the last frost. This ranges from mid-April for the Deep South to as late as June for those farther north.
How to plant sweet potato slips
Once you’ve prepared the soil and all danger of frost has passed, it’s time to plant those slips. The soil should be damp, so either water before planting or set out drip tape and turn it on – this also makes spacing easier, as you can see exactly where the emitters are.
Plant the slips six to 18 inches apart in rows 32 to 48 inches apart. The exact spacing really depends on how big you want your sweet potatoes to grow, as well as how much space you have available. If you’re not sure where to start, try 12-inch spacing the first year, and adjust as necessary in following years for larger or smaller roots.
The manner in which you plant the slips also depends on the desired size. Planting the slips vertically will result in larger roots while planting them at an angle will give you a larger crop of average-sized roots.
For the former method, plant them deep enough to cover the roots plus about a half-inch of the stem, and for the latter, plant almost horizontally about two to three inches deep, with most of the nodes underground.
Sweet potato plant care
Provide the plants with about one inch of water per week, especially just after planting and during the first month, which is the root development stage. In the second month, the plants turn their focus toward vine growth and storing starch and sugar in the roots. Keep the bed well weeded until the vines cover the soil, acting as a living mulch.
The sweet potatoes themselves begin to develop during the final month of growth, during which time you should stop watering to avoid cracking the skins. If heavy rainfall occurs during this final stage and causes cracking, most, if not all, of the sweet potatoes will still be safe to eat and will store well, as sweet potatoes are pretty good at healing over damaged areas.
Harvesting sweet potatoes
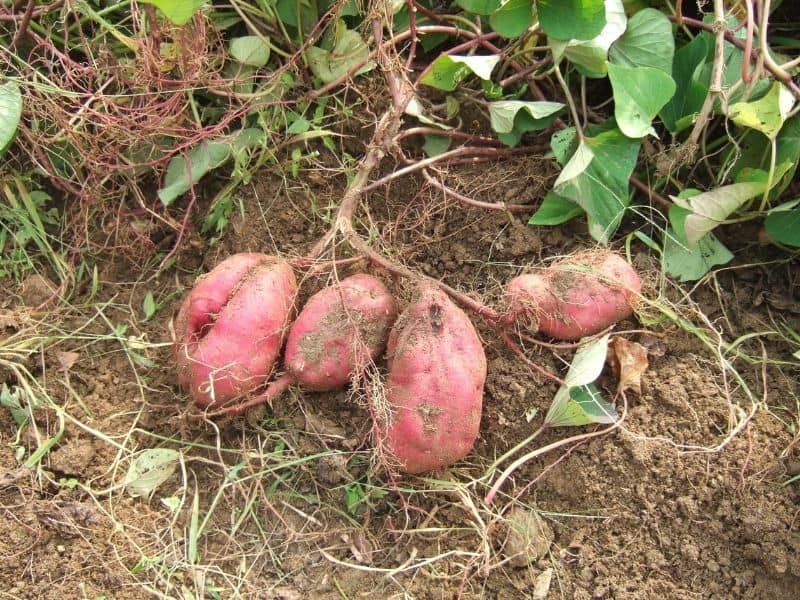
There really is no hard and fast rule as to when to harvest sweet potatoes. Of course, you want to wait at least the average number of days to maturity for your chosen variety, to ensure that the tubers have grown large enough. But beyond that, you can harvest right up until the first frost. The sweet potatoes will continue to grow, so the longer you wait, the larger they’ll be, but then you risk being surprised by an early frost.
On the day of harvest, cut and remove all of the vines from the section you plan to dig; having intertwined, they roll up quite easily. It’s better to underestimate how much you’ll get done, as leaving the vines attached will help protect the roots left in the ground.
If you want to try cooking the leaves like spinach, these can be harvested at any point as long as you are careful not to strip too many from any one plant.
Next, use a digging fork to carefully dig up the roots. This is the fun part! I enjoy the search for sweet potatoes in the soil and the wonderous surprise of giant tubers. However, the skins are delicate at this point, so be gentle. Never scrub or wash freshly dug sweet potatoes.
How to cure sweet potatoes
Interestingly, if you cook and eat a sweet potato fresh from the garden, it will be disappointingly bland. The sweetness and flavor actually come from the curing process, when some of the starch converts to sugar. Curing also allows cuts and cracks to heal over and skins to thicken, resulting in sweet potatoes that can be stored for months.
Place the sweet potatoes in a single layer in a warm, humid place, ideally 80-90 F and 80-90% humidity, and let them sit undisturbed for four to seven days.
A shady spot in a greenhouse is perfect for this, but if you don’t have one, you can get creative. A small, unused space such as a spare bedroom, bathroom, or even closet with a pan of water and a space heater can also work (just remember not to leave the space heater plugged in unattended for long periods of time).
I have had success placing sweet potatoes in plastic grocery bags in a sunny window in a spare bedroom, keeping the door shut, and turning on a space heater when the temperature drops too low.
If you can’t achieve the perfect conditions, don’t fret; just do the best you can. It will take a little longer, around 10 to 14 days, but the sweet potatoes will still cure.
You will know they’re ready when you rub two together and the skins don’t scratch. At this point, you can place your sweet potatoes in storage. With temperatures of 55-60 F, they should keep for about six months, if you don’t eat them all first!
Sweet potato slips for next season
If you want to grow your own slips the following year, set aside a few “mother roots” during harvest. These should be healthy, average-looking, small to medium sweet potatoes from plants with high yields and no rat-tail roots.
Each root will produce at least 10 slips, and each slip will grow four to 10 roots, though you should add 5-10% into your calculation of how many mother roots to set aside. Cure and store these with the rest of the sweet potatoes, making sure they are clearly labeled so they don’t accidentally get eaten!
Ten to 12 weeks before your planting date (see “sweet potato planting time” above), you should begin conditioning and sprouting your mother roots. To condition, put the roots in flats, trays, or boxes in a warm, moist, light location – about 75-85 F and 95% humidity – for two to four weeks. Although this step isn’t necessary, it can double or triple the number of slips each root will sprout in time for planting.
The same location used for conditioning will also work well for sprouting. Plant the mother roots horizontally in flats of well-draining potting mix, spacing them close enough to almost touch. Keep the soil moist, and in five to seven days, slips should begin to sprout. Once they reach six to 12 inches tall and have four to six leaves, cut the slips from the mother roots and stand them in jars or small buckets of water. They won’t all reach this stage at once, so check on the slips daily and cut those that are ready.
Once a week, plant the oldest slips with good roots into flats of compost (about four inches deep) in a bright, frost-free location and keep them moist. Ten days or so from planting out, begin hardening off the slips. This is another step that you can skip, but it will strengthen the slips and give you greater flexibility in planting dates.
FAQs
Frost is predicted, and I haven’t harvested all the sweet potatoes. What should I do?
If the days are still warm and leafy vines are still attached to the roots, a light frost or two likely won’t ruin your crop. However, it’s a good idea to dig up the sweet potatoes as soon as possible, whether that’s before the frost hits or within a day or two afterward. A thick layer of mulch or another cover might help protect the unharvested roots in a pinch.
How long of a growing season do I need to raise sweet potatoes?
Most sweet potatoes require about 110 days to reach maturity, but some short-season varieties can be harvested in as few as 90.
My sweet potatoes are long and thin. Is there something wrong with my soil?
A reduced yield consisting of mainly long, slender roots may be an indication of a potassium deficiency or too much nitrogen. Alternatively, if you end up with a lot of oddly shaped sweet potatoes, the soil likely contains too many rocks and lumps. Long, stringy sweet potatoes are a sign of overwatering.
Sweet potato vines are growing beyond the garden area. Can I trim them to keep them in bounds?
Avoid trimming the vines, if possible, but do redirect them if they begin to escape their designated area. Moving the vines can also help prevent them from putting down additional roots, thus encouraging them to instead put more energy into the main tubers.
Enjoy a sweet harvest
 If you like sweet potatoes as much as I do (they definitely top my list of favorite vegetables!), these low-maintenance vines just might be the perfect addition to your vegetable garden. Imagine digging up bucketfuls of sweet potatoes and having them on hand throughout the winter and spring for casseroles, stews, and roasted veggies. And if you save a few choice roots, you can grow more delicious tubers next year without spending a penny! Happy planting, and enjoy the harvest.