
The garden may be asleep, but that doesn’t mean the gardener gets to hibernate. Winter is more than just a dormant period; it’s a unique opportunity to focus on the tasks that often get overlooked during the hustle and bustle of spring planting and summer harvesting. This quieter season lends itself perfectly to planning, organizing, and laying the groundwork for a successful year ahead.
From reviewing last season’s successes and challenges to sketching out planting layouts or ordering seeds, winter allows you to be intentional about the future. Use this valuable downtime to reflect, prepare, and ensure your next growing season is set up for success with these essential winter activities.
Here are 16 things you can do this winter for your garden.
1. Clean, Sharpen, and Organize Tools

Image Credit: Shutterstock.
Every good gardener knows that reliable tools are half the battle. Winter is the ideal time to give them some much-needed attention. After a long season of digging, cutting, and hacking, your equipment has earned a spa day. Cleaning off caked-on mud prevents rust and disease transmission, while sharpening blades makes for cleaner cuts and less work for you.
Properly cared-for tools last longer and perform better, reducing plant damage and gardener frustration. Storing them in an organized way means you can grab what you need and get to work the moment inspiration strikes in spring.
Quick Guide:
- Clean: Use a stiff brush and water to scrub away dirt. Use steel wool for stubborn rust spots.
- Sharpen: Use a file or a sharpening stone on the beveled edge of pruners, loppers, and shovels.
- Oil: Wipe a thin coat of linseed oil or machine oil on metal parts to prevent rust and on wooden handles to prevent cracking.
- Organize: Store tools in a dry, accessible place, like a pegboard or a dedicated garden shed shelf.
2. Collect and Save Seeds

Image credit: Backyard Garden Lover.
Remember that amazing tomato or that ridiculously prolific zucchini? You can have them again next year, for free. Collecting seeds from your favorite open-pollinated or heirloom plants preserves their genetic traits. It’s a sustainable practice that saves money and connects you more deeply to your garden’s cycle.
Be sure to harvest from your healthiest and most productive plants to carry those strong characteristics forward. Proper drying and storage are critical to ensure the seeds remain viable until you are ready to plant them.
Quick Guide:
- Harvest: Let seed pods dry on the plant whenever possible. For wet seeds (like tomatoes), scoop them out, ferment them in water for a few days, then rinse and dry.
- Dry: Spread seeds on a screen or paper plate in a well-ventilated area away from direct sunlight until they are completely dry.
- Store: Place dried seeds in labeled paper envelopes or small glass jars.
- Location: Keep them in a cool, dark, and dry spot, like a closet or a refrigerator.
3. Update Your Garden Journal and Plans

Image Credit: Shutterstock.
A gardener’s best tool might just be a journal. The off-season provides the perfect quiet moments to reflect on the past year. What grew well? What was a complete disaster? Where did the cucumber beetles stage their hostile takeover? Documenting these successes and failures is invaluable for future planning.
Use these notes to sketch out new garden layouts, create a crop rotation schedule to prevent soil-borne diseases, and make your seed shopping list. A well-thought-out plan prevents impulsive spring purchases and helps you use your space more efficiently.
Quick Guide:
- Record: Note which varieties thrived and which flopped. Document pest and disease issues and what you did to manage them.
- Map: Draw your garden layout, noting where each crop was planted.
- Plan: Use your notes to design next year’s garden, rotating plant families to different beds.
- List: Create a detailed seed and supply list to stay organized and on budget.
4. Cold-Stratify Perennial Seeds

Image Credit: Shutterstock.
Some seeds are tough customers. They refuse to sprout until they have experienced a period of cold, damp conditions, a process called stratification. This dormancy mechanism prevents them from germinating too early in the fall, only to be killed by the cold. Many native plants and perennials like coneflowers, lupines, and delphiniums require this treatment.
You can mimic nature’s process right in your refrigerator. This simple technique dramatically increases germination rates for these specific plants, giving you more flowers for your effort.
Quick Guide:
- Method: Mix seeds with a small amount of damp (not wet) sand, vermiculite, or a paper towel.
- Chill: Place the mixture in a labeled plastic bag or container and put it in the refrigerator.
- Duration: Keep them chilled for 4 to 12 weeks, depending on the species. Check the seed packet for specific instructions.
- Sow: After the cold period, plant the seeds as you normally would indoors or directly in the garden once the weather is right.
5. Winter-Sow Seeds Outdoors
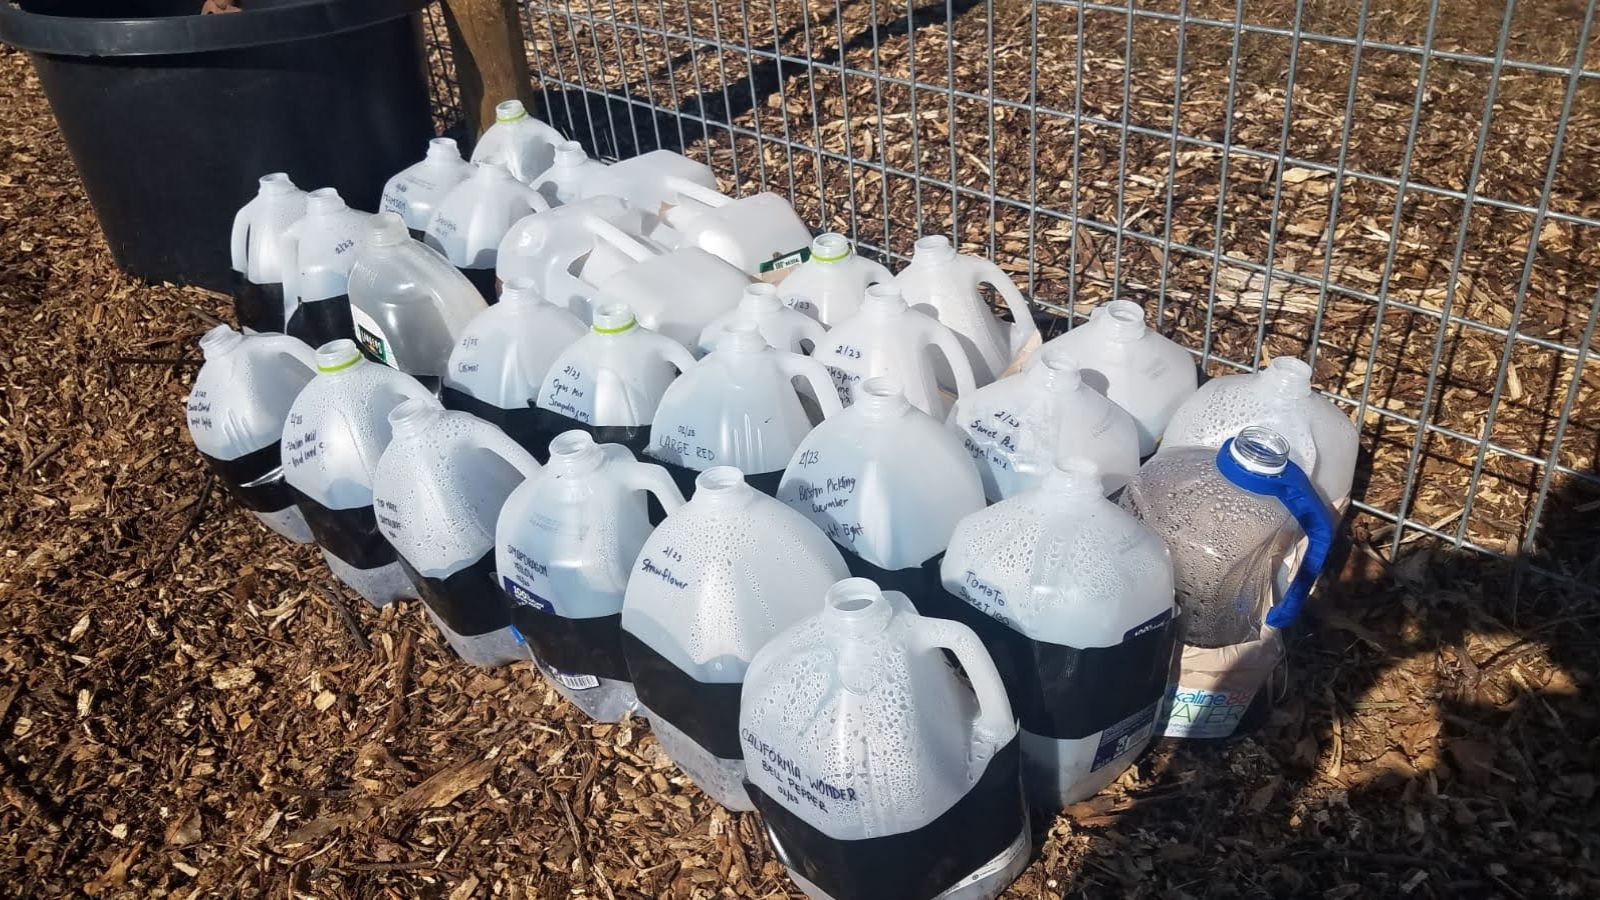
Image credit: Backyard Garden Lover.
For a low-effort approach to stratification, try winter sowing. This method uses miniature DIY greenhouses made from translucent containers, like milk jugs or salad clamshells, to sprout hardy seeds outdoors. The containers protect the seeds from pests and harsh weather while allowing natural freeze-thaw cycles to trigger germination.
This technique is perfect for gardeners with limited indoor space for seed starting. It produces robust, weather-hardened seedlings that are ready for transplanting in spring without the need for hardening them off.
Quick Guide:
- Prepare Containers: Cut milk jugs in half, leaving a small hinge. Poke drainage holes in the bottom and ventilation holes in the top.
- Plant: Fill the bottom half with moist potting soil, sow seeds, and lightly cover them.
- Seal and Label: Water lightly, then tape the container closed. Label it clearly with a permanent marker.
- Wait: Place the containers outside in a spot where they will receive rain and snow. The seeds will sprout when the time is right in spring.
6. Start Long-Season Seeds Early Indoors

Image Credit: Shutterstock.
Some plants operate on their own relaxed schedule. Slow-growers like lavender, rosemary, peppers, and lisianthus need a very long runway to mature and produce flowers or fruit. Starting them indoors up to 12 weeks before your last frost date gives them the head start they need.
This task requires some indoor real estate and often a grow light to prevent seedlings from becoming weak and leggy. The reward is having strong, well-established plants ready to go into the garden as soon as the weather warms, leading to earlier and more abundant harvests.
Quick Guide:
- Timing: Count back 8-12 weeks from your average last frost date to determine when to start.
- Setup: Use seed-starting trays with a quality seed-starting mix. Provide supplemental light with a grow light for 14-16 hours a day.
- Care: Keep the soil consistently moist but not waterlogged. Ensure good air circulation to prevent fungal diseases.
- Potting Up: Transplant seedlings into larger pots as they grow to give their roots more space.
7. Assess Your Garden’s “Bones”

Image Credit: Shutterstock.
When the flowers and foliage have faded, your garden’s underlying structure is revealed. This is the perfect time to evaluate the “bones” of your landscape: the paths, patios, bed shapes, walls, and arbors. Without the distraction of lush growth, you can see what works and what does not.
Is the garden path too narrow? Is a bed an awkward shape to mow around? Do you need a focal point, like a bench or a trellis? Use this clear view to plan hardscaping projects or redesign garden bed layouts for better flow and function.
Quick Guide:
- Observe: Walk through your garden and take photos from different angles. Notice the lines, shapes, and empty spaces.
- Identify Issues: Look for areas that feel cramped, disconnected, or just plain awkward.
- Sketch Ideas: Draw out potential changes, like curving a path, expanding a bed, or adding a vertical element.
- Plan Projects: Make a list of materials and steps for any hardscaping changes you want to make in the spring.
8. Prune Trees and Shrubs

Image Credit: Shutterstock.
With leaves gone, it’s easy to see the complete branch structure of deciduous trees and shrubs. This makes winter the prime season for pruning. The goal is to remove dead, damaged, or diseased wood, as well as branches that are crossing or rubbing against each other. This improves the plant’s health and structure.
Dormant pruning is less stressful for the plant and minimizes the risk of pest or disease entry. Just be sure to skip any spring-blooming shrubs, like lilacs or forsythia, as they have already set their flower buds for the coming season. Pruning them now would mean sacrificing those beautiful spring flowers.
Quick Guide:
- What to Prune: Summer-blooming shrubs (like potentilla), fruit trees, and shade trees.
- What to Remove: Dead, diseased, or broken branches. Also trim branches that cross, rub, or grow inward toward the center of the plant.
- Technique: Make clean cuts just outside the branch collar (the swollen area where the branch meets the trunk).
- What to Avoid: Do not prune spring-blooming shrubs (like azaleas, rhododendrons, and magnolias) until after they have finished flowering.
9. Inspect and Maintain Garden Protection
Image Credit: Shutterstock.
Winter can be a tough time for wildlife, and your trees and shrubs might look like an all-you-can-eat buffet. Rabbits, voles, and deer can cause significant damage by gnawing on bark, which can girdle and kill a young tree.
Before the first heavy snow, inspect existing fences and tree guards for any damage. If you haven’t installed protection yet, now is the time. Hardware cloth cylinders are excellent for preventing vole and rabbit damage at the base of trees, while taller fencing or repellents can help deter deer.
Quick Guide:
- Inspect: Check that existing fences, wraps, and guards are secure and have no gaps.
- Install: Place tree guards or hardware cloth cylinders around the trunks of young trees and shrubs. The guard should extend a few inches into the soil and be tall enough to rise above the expected snow line.
- Fencing: For larger areas, ensure fences are at least 8 feet tall to deter deer.
- Repellents: Reapply taste or scent-based animal repellents after heavy rain or snow.
10. Reapply or Refresh Mulch

Image Credit: Shutterstock.
Mulch is a garden’s protective blanket. A healthy layer insulates plant roots from extreme temperature fluctuations, conserves moisture, and prevents soil erosion from winter winds and rain. Over the season, mulch can become compacted or decompose.
Winter is a good time to check your mulch depth and fluff it up with a rake or add a fresh layer. A 2 to 3-inch layer is ideal. This simple task helps maintain steady soil temperatures, protecting roots from damaging freeze-thaw cycles.
Quick Guide:
- Check Depth: Aim for a 2-3 inch layer of organic mulch like shredded leaves, wood chips, or straw.
- Fluff: Use a rake to gently break up any compacted or matted areas to improve air and water flow.
- Replenish: Add more mulch to areas where it has thinned out over the season.
- Avoid Volcanoes: Keep mulch pulled back a few inches from the trunks of trees and the stems of plants to prevent rot and pest issues.
11. Plant Any Unplanted Fall Bulbs

Image Credit: Shutterstock.
Did you find a forgotten bag of tulips or daffodils in the garage? Don’t despair. As long as the ground isn’t frozen solid and you can still get a shovel in, you can plant them. Late is better than never.
Spring-blooming bulbs need a period of cold to develop roots and prepare for flowering. Planting them now, even in December or January, will still give them enough chill time. They may bloom a little later than their properly-planted neighbors, but you will likely still get a show.
Quick Guide:
- Check Soil: If you can dig, you can plant.
- Dig Deep: Plant bulbs at a depth of about three times their height. Pointy side up.
- Add Protection: If rodents are a problem in your area, consider planting bulbs in wire cages or adding repellents to the planting hole.
- Water In: Water them once after planting to settle the soil.
12. Check Stored Bulbs, Tubers, and Produce
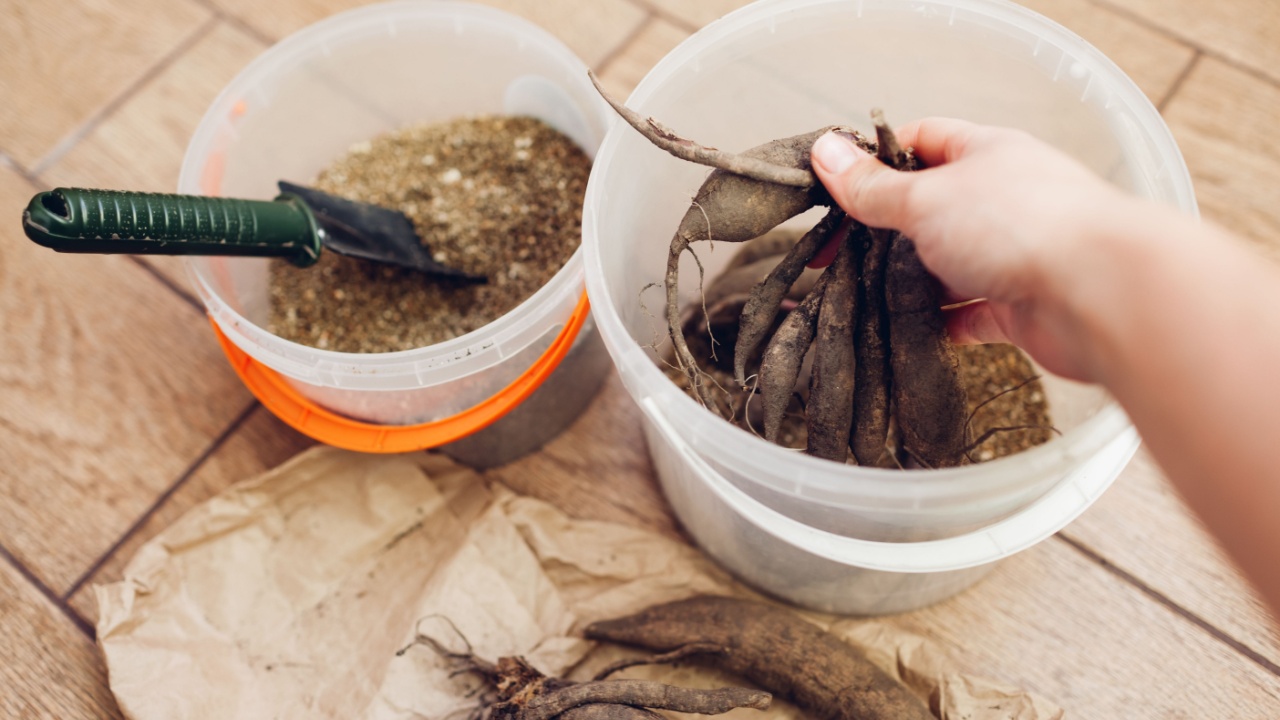
Image Credit: Shutterstock.
If you dug up tender bulbs like dahlias and gladiolus, or have a stash of winter squash and potatoes, they need a periodic checkup. Storage is not a set-it-and-forget-it activity. One rotting item can quickly spoil the whole batch.
Inspect your stored treasures every few weeks. Look for any signs of mold, rot, or soft spots. Also, check for shriveling, which indicates the storage area is too dry. Proper storage conditions are key to keeping your harvest and dormant plants healthy until spring.
Quick Guide:
- Inspect: Gently check each tuber, bulb, or vegetable for soft spots, mold, or decay.
- Discard: Immediately remove and dispose of any items showing signs of rot to prevent it from spreading.
- Adjust Moisture: If tubers or bulbs are shriveling, lightly mist the packing material (peat moss or sawdust) with water. If there’s condensation, increase ventilation.
- Ensure Airflow: Make sure items are not packed too tightly and that there is good air circulation.
13. Leave Some Leaves and Plant Debris

Image Credit: Deposit Photos.
This may be the only thing in a list of things to do. Put down the rake, at least in some areas. While it is good to clear leaves off the lawn, leaving them in your garden beds provides numerous benefits. Leaf litter acts as a free, natural mulch that insulates soil and suppresses weeds.
More importantly, that “mess” provides a crucial winter habitat for a host of beneficial insects, pollinators, and other small critters. Many butterfly and moth species overwinter as pupae in fallen leaves, and queen bumblebees nest just under the soil surface. Leaving some debris helps ensure a healthy ecosystem in your garden next year.
Quick Guide:
- Where to Leave: In perennial beds, under shrubs, and in a designated “wild” corner of your yard.
- Where to Rake: Remove thick layers of leaves from your lawn to prevent the grass from suffocating.
- Shred Leaves: If you have a large volume, shredding them with a lawn mower helps them break down faster and makes a finer mulch.
- Spring Cleanup: Wait until temperatures are consistently above 50°F in the spring before clearing the beds, giving overwintering insects a chance to emerge.
14. Compost and Spread Organic Matter
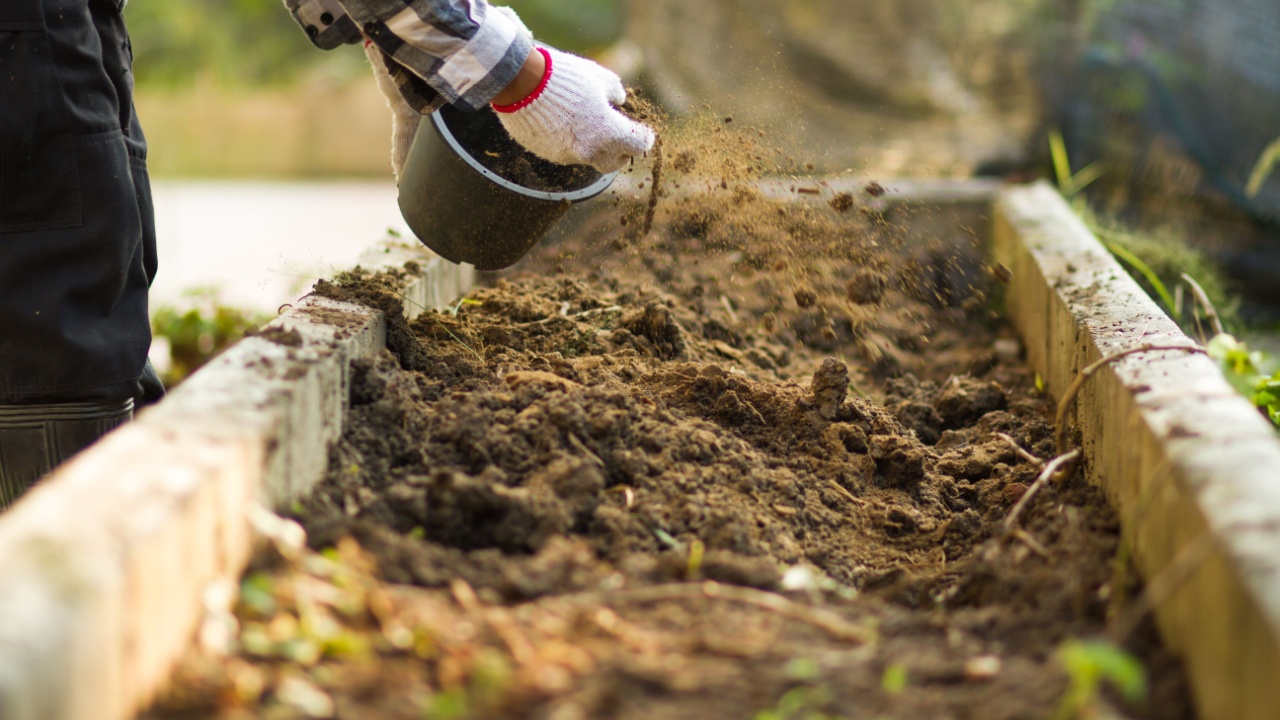
Image Credit: Shutterstock.
Your compost pile doesn’t completely stop working in the winter. The decomposition process slows down, but it continues. Keep adding kitchen scraps (avoiding meat and dairy) and garden waste throughout the season.
If you have a batch of finished compost ready, winter is a fantastic time to spread it on your garden beds. A top dressing of compost will be slowly worked into the soil by winter rain, snow, and soil life. This enriches the soil with nutrients and improves its structure, getting it ready for spring planting.
Quick Guide:
- Keep Adding: Continue adding a mix of “greens” (kitchen scraps) and “browns” (dry leaves, shredded paper) to your pile.
- Insulate: Cover your compost pile with a tarp or a thick layer of straw to help it retain heat and moisture.
- Spread Finished Compost: Apply a 1-2 inch layer of finished compost on top of empty vegetable and annual beds.
- No Tilling Needed: Let winter weather and earthworms do the work of incorporating the compost into the soil.
15. Research New Plants and Techniques

Image Credit: Shutterstock.
With the garden quiet, your mind can get busy. Winter is the perfect season for some armchair gardening. Dive into seed catalogs, check for flowers that will make your landscape fancy, and read books about new techniques you want to try.
Have you always wanted to build a raised bed? Are you curious about companion planting or vertical gardening? Use this time to learn. Researching new plant varieties that are better suited to your climate or resistant to pests can save you a lot of future headaches.
Quick Guide:
- Explore: Order seed catalogs (the paper kind are especially fun) and dream about new possibilities.
- Learn: Read books, blogs, and watch videos on topics that interest you, from permaculture to container gardening.
- Select Wisely: When choosing new plants, pay attention to their needs for sun, water, and soil, and make sure they match your garden’s conditions.
- Try Something New: Decide on one new technique or type of plant to experiment with in the coming year.
16. Plan for Pest and Disease Management

Image Credit: Shutterstock.
An ounce of pest prevention is worth a pound of cure, especially in the garden. Reflect on which pests and diseases gave you grief last season. Was it powdery mildew on the squash or aphids on the kale?
Research organic and preventative strategies you can implement next year. This could include choosing disease-resistant varieties, planning companion plantings that deter pests, or ensuring proper spacing for good air circulation. A proactive plan is much more effective than a reactive scramble when problems appear.
Quick Guide:
- Identify Culprits: Use your garden journal to recall the major pest and disease issues of the past year.
- Research Solutions: Look up organic management strategies for those specific problems.
- Plan Ahead: Incorporate preventative measures into your garden plan, such as crop rotation, resistant cultivars, and beneficial insect habitats.
- Stock Supplies: Make a list of any organic sprays, row covers, or other supplies you might need so you have them on hand before trouble starts.
Gardening is a Year-Round Hobby (Work)

Image Credit: Deposit Photos.
You’re probably wondering if your garden misses you as much as you miss your garden. The answer: probably not, but it definitely appreciates the behind-the-scenes work. All those small winter chores mean fewer last-minute panics when the daffodils start gossiping about who overslept. Every seed packet sorted, bulb checked, and tool pampered is like a bit of pre-season pep talk for your patch of earth. Prep done now pays off later, usually in flowers, tomatoes, and the occasional neighbor asking for your secret.