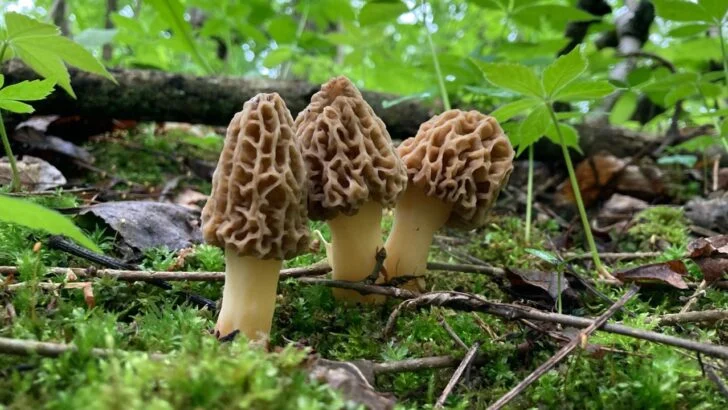
Morel mushrooms are the elusive, honeycomb-capped treasures of the forest floor, prized by chefs and foragers for their rich, nutty flavor. But what if you could cultivate these gourmet fungi right in your own garden?
While notoriously tricky to grow, a few key strategies can turn a patch of your backyard into a personal morel hotspot. Growing morels is a project that rewards patience and a little bit of know-how.
This guide provides 12 essential hacks to help you create the perfect environment for morels to thrive, brought to you by mushroom-growing enthusiasts around the globe.
Creating the right conditions won’t guarantee success every season, but each attempt teaches you more about how these mushrooms behave. Over time, you’ll start to recognize the subtle signs of a promising patch and understand what encourages morels to return. With patience and a willingness to experiment, your backyard can become a reliable spot for these elusive forest delicacies.
1. Prepare the Soil with Hardwood Mulch and Ash
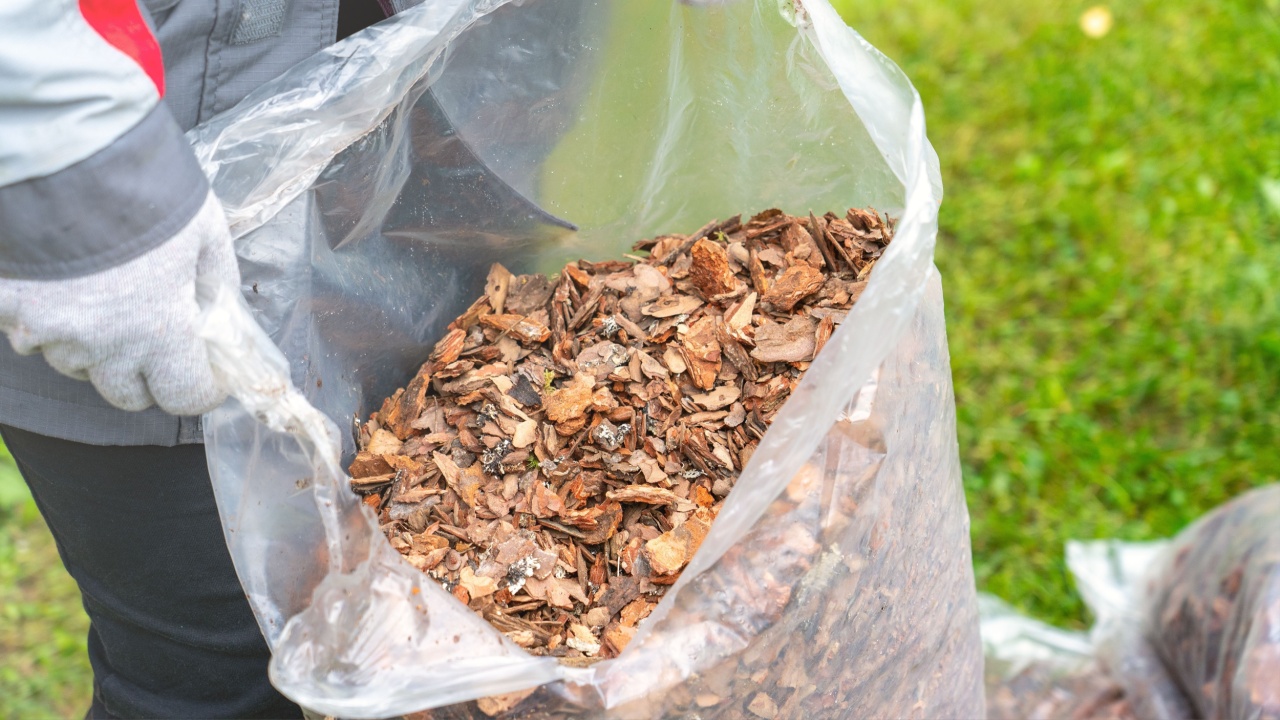
Image Credit: Shutterstock.
Morels thrive in soil that mimics a forest floor, rich with specific organic materials. Creating this foundation is arguably the most critical step in successfully cultivating them at home. Start by choosing a shaded, well-draining spot in your yard.
Begin by laying down a layer of hardwood mulch. Woods like ash, elm, and poplar are excellent choices because they provide the carbohydrates the morel mycelium (the underground fungal network) needs to grow. Avoid softwood mulches, such as pine or cedar, as their resins can inhibit fungal growth. Next, mix in a small amount of wood ash from untreated hardwood. Ash helps to slightly increase the soil alkalinity and adds essential minerals, simulating the aftermath of a forest fire—an event known to trigger morel fruiting.
- Quick Guide:
-
- Action: Layer hardwood mulch (ash, elm, poplar) in a shaded area.
- Why: Provides essential food for the morel mycelium.
- Pro Tip: Add a light sprinkling of untreated hardwood ash to the mulch to add minerals and adjust pH.
2. Get the Soil pH Just Right

Image Credit: Shutterstock.
Morel mushrooms are sensitive to their soil’s chemical balance. They prefer a soil pH that is close to neutral, typically ranging from 6.5 to 7.5. If your soil is too acidic or too alkaline, the mycelium will struggle to establish itself, and you may never see any mushrooms.
You can determine your soil’s pH using a simple, inexpensive test kit available at most garden centers. If your soil is too acidic (below 6.5), you can amend it by adding wood ash or garden lime. If it’s too alkaline (above 7.5), incorporating peat moss or gypsum can help lower the pH. Make these adjustments gradually over several weeks before you introduce the morel spores.
- Quick Guide:
-
- Action: Use a soil test kit to check the pH of your planned morel patch.
- Why: Morels need a neutral pH (6.5-7.5) to flourish.
- Pro Tip: Adjust acidic soil with wood ash or lime, and alkaline soil with peat moss.
3. Inoculate with a Spore Slurry

Image Credit: Shutterstock.
To start your morel patch, you need to introduce the fungus to the soil. This process is called inoculation. One of the most effective methods for home gardeners is creating a spore slurry. You can either purchase a morel spawn kit online, which often contains live mycelium, or create your own slurry from dried or fresh morel mushrooms.
To make a slurry, blend a few morel mushrooms (fresh or rehydrated) with a gallon of non-chlorinated water, a tablespoon of salt (to deter bacteria), and a tablespoon of molasses (as a food source for the spores). Let the mixture sit for a day or two, then pour it over your prepared soil bed. This method evenly distributes millions of spores, increasing the chances of establishing a healthy mycelial network.
- Quick Guide:
-
- Action: Create a spore slurry by blending morels, water, salt, and molasses.
- Why: It’s an effective way to introduce spores and kickstart mycelial growth.
- Pro Tip: Use non-chlorinated water, as chlorine can kill the delicate spores. Pour the slurry over the entire prepared bed.
4. Plant at the Right Time

Image Credit: Shutterstock.
Timing is everything with morels. They require a period of cold dormancy before they will fruit. The best times to inoculate your morel bed are in the late summer, fall, or very early spring. Planting during these periods allows the mycelium to establish itself before winter.
The cold winter temperatures trigger a change in the mycelium, preparing it to produce mushrooms when the soil warms up in the spring. Planting in the heat of summer is often unsuccessful because the high temperatures can stress or kill the developing fungus. By aligning your planting with the seasons, you work with the morel’s natural life cycle, not against it.
- Quick Guide:
-
- Action: Inoculate your morel patch in late summer, fall, or early spring.
- Why: Morels need a cold dormancy period to prepare for spring fruiting.
- Pro Tip: Fall inoculation gives the mycelium several months to develop before the first spring thaw.
5. Keep the Bed Moist, Not Waterlogged

Image Credit: Shutterstock.
Consistent moisture is crucial for morel cultivation, but overwatering can be disastrous. The soil should feel like a damp sponge—moist to the touch but not dripping wet. If the soil becomes waterlogged, it can suffocate the mycelium and promote the growth of competing molds and bacteria.
During dry spells, water your morel patch lightly with a gentle spray from a hose or a watering can. Avoid blasting the soil with a powerful stream of water, which can disturb the delicate underground network. If your area receives heavy rain, ensure your patch has good drainage to prevent water from pooling.
- Quick Guide:
-
- Action: Water lightly and regularly to maintain consistent soil moisture.
- Why: Prevents the mycelium from drying out or drowning.
- Pro Tip: Check the soil daily by touching it. If it feels dry an inch down, it’s time for a light watering.
6. Introduce Companion Trees

Image credit: YAY Images.
In the wild, morels are often found near specific types of trees. They form a symbiotic relationship with the tree roots, exchanging nutrients for mutual benefit. The most well-known morel companions are dying elm trees, but they also associate with ash, old apple trees, and poplars.
If you don’t have these trees already, consider planting a young sapling near your morel patch. While it will take years for a deep symbiotic relationship to form, the presence of these trees can improve your long-term success. The leaf litter from these deciduous trees also contributes to the ideal soil composition.
- Quick Guide:
-
- Action: Plant your morel patch near existing ash, elm, or apple trees, or plant a new one nearby.
- Why: Morels form beneficial relationships with the roots of certain trees.
- Pro Tip: Dying (but not dead) elm trees are famously associated with bumper crops of morels.
7. Use Native Morel Species

Image Credit: Shutterstock.
Not all morels are the same. Different species are adapted to different climates, soil types, and companion trees. For the best chance of success, try to obtain spores or spawn from morel species that are native to your region.
Attempting to grow a morel species from a completely different part of the country can be an uphill battle. Local strains are already genetically adapted to your area’s seasonal changes and environmental conditions. You can find local spores by responsibly harvesting a few wild morels or by purchasing spawn from suppliers who specialize in regional genetics.
- Quick Guide:
-
- Action: Source morel spores or spawn that are native to your geographic region.
- Why: Local species are better adapted to your climate and soil.
- Pro Tip: Research which morel species (e.g., Morchella americana, Morchella esculenta) grow wild in your state.
8. Ensure Good Airflow

Image Credit: Shutterstock.
While moisture is important, stagnant, damp air is an invitation for mold and mildew that can outcompete your morels. Proper air circulation helps keep the surface of the soil healthy and discourages unwanted fungal growth.
If your morel patch is in a very sheltered location, consider ways to improve airflow without drying out the soil. Avoid dense, low-growing ground cover right next to the bed. If you use logs or wood chips to border your patch, leave small gaps between them. A gentle breeze is beneficial; a strong, drying wind is not.
- Quick Guide:
-
- Action: Choose a location that gets gentle air circulation.
- Why: Prevents mold and mildew from taking over your morel patch.
- Pro Tip: Prune back any low-hanging branches or dense shrubs that might block airflow to the area.
9. Avoid Fertilizers and Chemicals

Image Credit: Shutterstock.
Morel mycelium is extremely sensitive to synthetic chemicals. Never apply pesticides, herbicides, or chemical fertilizers to your morel patch or the surrounding area. These substances can easily kill the fungus or prevent it from ever producing mushrooms.
Rely on natural amendments like compost, leaf litter, and wood ash to enrich your soil. If you are dealing with pests or weeds in the vicinity, use manual removal or organic methods that won’t harm the delicate fungal network you’re trying to cultivate. Patience and a light touch are far more effective than chemical intervention.
- Quick Guide:
-
- Action: Do not use any synthetic fertilizers, pesticides, or herbicides near your patch.
- Why: Chemicals can kill the sensitive morel mycelium.
- Pro Tip: If your lawn is treated with chemicals, create your morel patch a safe distance away where runoff won’t be an issue.
10. Add a Layer of Leaf Litter

Image Credit: Shutterstock.
In addition to hardwood mulch, a top layer of leaf litter from deciduous trees provides multiple benefits. This layer helps retain soil moisture, insulates the mycelium from extreme temperature fluctuations, and breaks down over time to provide a slow-release source of nutrients.
In the fall, gather leaves from oak, ash, maple, or fruit trees and spread a one-to-two-inch layer over your morel bed. The leaves will slowly decompose over the winter, enriching the soil. Come spring, the morels may even push their way up directly through the leaf litter, just as they do in the forest.
- Quick Guide:
-
- Action: Apply a 1-2 inch layer of deciduous leaf litter over your morel bed in the fall.
- Why: Retains moisture, insulates the soil, and provides natural nutrients.
- Pro Tip: Avoid using leaves from black walnut trees, as they release a chemical called juglone that is toxic to many plants and fungi.
11. Feed Your Patch with Starchy Water

Image Credit: Shutterstock.
Once your patch is established, you can give the mycelium an occasional boost by “feeding” it. The fungal network consumes carbohydrates to fuel its growth. Periodically pouring cooled, unsalted water from boiling pasta or potatoes over the bed can provide an easy-to-digest source of starches.
This supplemental feeding is most effective in the weeks leading up to the spring fruiting season. It can encourage a more robust mycelial network and potentially lead to a larger harvest. Do this sparingly—once or twice during the early spring is plenty.
- Quick Guide:
-
- Action: Occasionally water the patch with cooled, unsalted water from boiling pasta or potatoes.
- Why: Provides an extra carbohydrate source to feed the growing mycelium.
- Pro Tip: Only do this in early spring as soil temperatures begin to rise above 40°F (4°C).
12. Be Patient
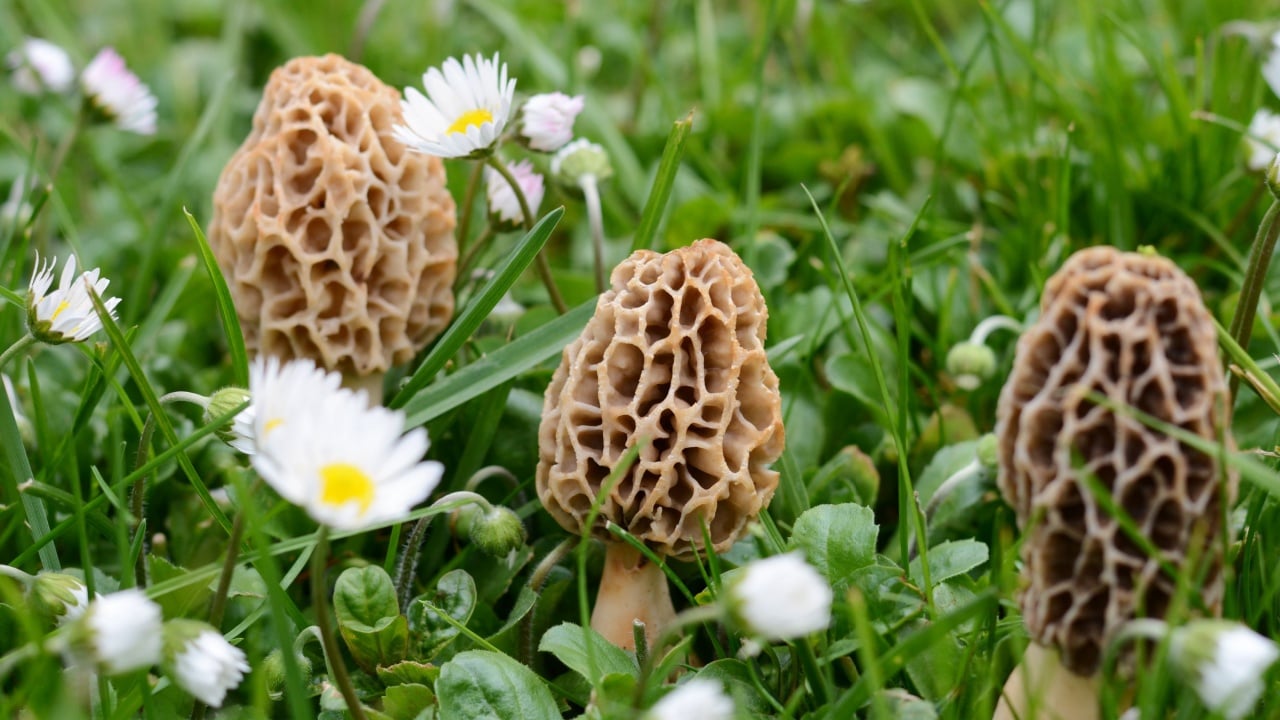
Image Credit: Shutterstock.
This is perhaps the most important and most difficult hack of all. Growing morels is a long-term project. Even with perfect conditions, it can take 12 to 18 months, or even longer, for the mycelium to mature enough to produce mushrooms. Many aspiring growers give up too soon, assuming their efforts have failed.
During this waiting period, resist the urge to dig into the soil to check for growth, as this can damage the delicate mycelial threads. Maintain the patch by keeping it moist and free of weeds, and let nature take its course. Your patience will be rewarded when you one day spot the first distinctive, honeycombed cap pushing through the soil.
- Quick Guide:
-
- Action: Maintain your patch and wait. Don’t disturb the soil.
- Why: The mycelium needs a year or more to establish before it can fruit.
- Pro Tip: Keep a garden journal to track your steps and the patch’s conditions. It will help you stay engaged and patient through the process.
Mushroom Growing Goodness

Image Credit: Shutterstock.
Growing morels is a hobby that connects you deeply to the subtle rhythms of nature. Now that you have the knowledge, it’s time to start.
With a little care and a lot of patience, you may soon be harvesting one of gastronomy’s greatest treasures from your own backyard.
Read more:
18 Cool Mushrooms You Might Find Growing in Your Own Backyard
Turn a Log into a Mushroom Farm with This Simple Method
