Kitchens have evolved from spaces requiring intense manual labor into hubs of automated efficiency. Electric gadgets dominate countertops today, pushing older tools into the shadows of vintage shops and dusty attics. People often assume that newer means better, dismissing analog devices as mere novelties from a bygone era.
Historical analysis of domestic science shows a massive shift during the 20th century. According to industrial design records, the rapid electrification of homes between the 1920s and 1950s led to a boom in motorized culinary gadgets. Manufacturers prioritized speed and convenience over durability and manual control.
Yet modern consumer reports indicate a growing frustration with planned obsolescence in contemporary electronics. A recent survey of culinary professionals revealed that nearly 40 percent prefer specific manual tools for tasks requiring precision. These older items rarely break, require no electricity, and produce superior textures compared to motorized counterparts.
This guide explores a selection of vintage culinary devices that remain highly functional today. Readers will discover how these specific manuals and early electric tools operate. The following list details 14 retro appliances that deserve a spot in a modern kitchen.
1. Manual Nut Grinders
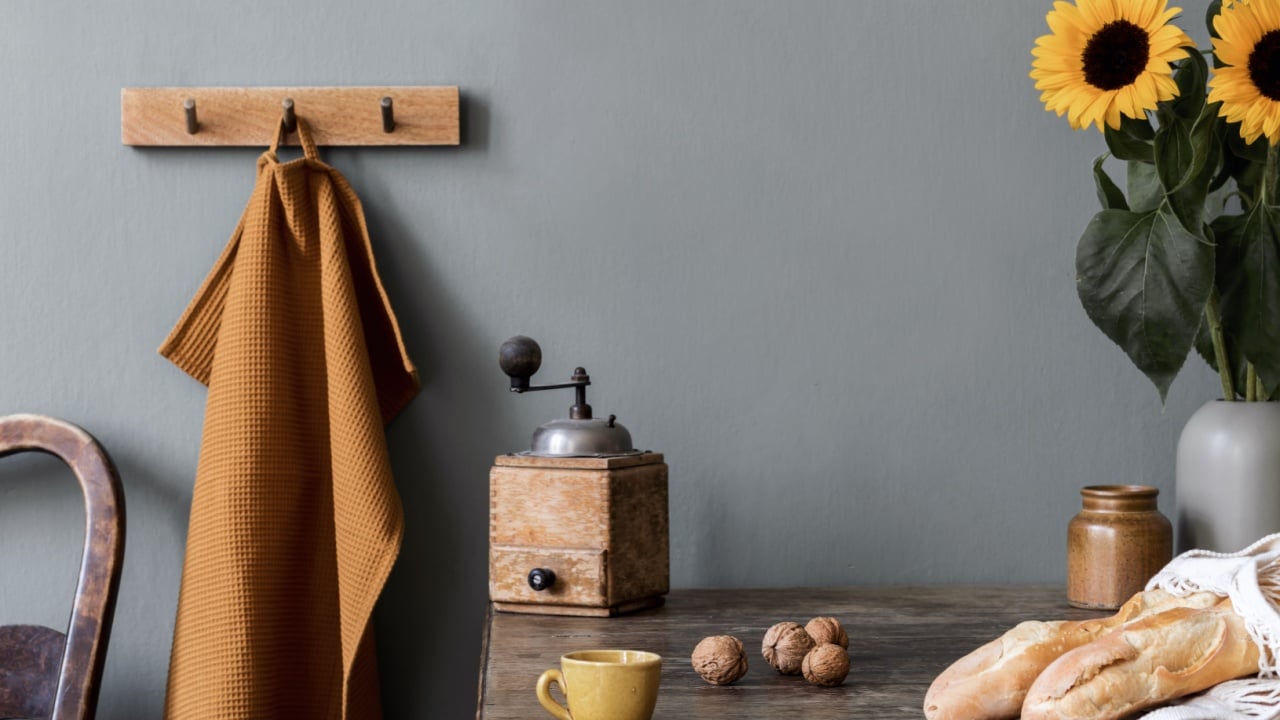
Image Credit: Shutterstock.
Remember those old-fashioned nut grinders from your grandma’s kitchen? Invented back in 1935, these gadgets feature a glass base with a hand-cranked chopper on top. You just pop your nuts in, turn the handle, and a set of metal teeth chop them into perfect little pieces without turning them into oily mush. It’s a simple, effective way to get perfectly chopped walnuts or almonds.
Unlike modern food processors that can spin too fast and heat the nuts (which releases bitter oils), manual grinding keeps them cool and crunchy, ideal for baking. Plus, the clear glass base lets you see exactly how much you’ve chopped, so you can stop right when you have enough. No more food waste or messing up your recipes!
Finding one of these vintage grinders at a thrift store is a great, eco-friendly move. Just pop the glass jar in the dishwasher and hand-wash the top. It’s a low-tech tool that delivers high-quality results for all your baking adventures.
2. Wall-Mounted Can Openers
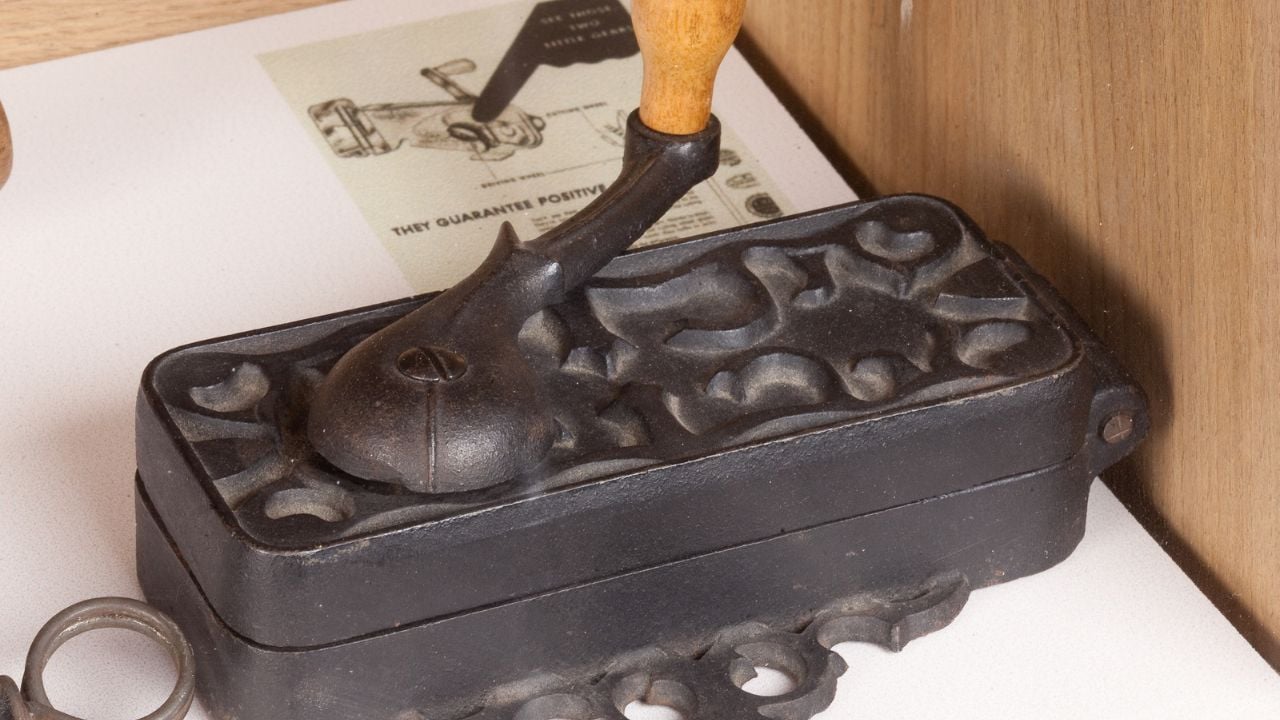
Image Credit: Food museums of the province of Parma – CC BY-SA 3.0/Wiki Commons.
Back in the 1950s, the wall-mounted can opener was a kitchen staple. This heavy-duty metal gadget attaches right to your wall or cabinet, featuring a hand-cranked blade and a handy magnet to catch the lid. You just flip it out to open even the biggest cans and fold it back against the wall when you’re done.
Modern handheld can openers can be flimsy and often break or struggle with large tins. The wall-mounted version gives you way more leverage, making it a breeze to open cans, even if you have limited grip strength. Best of all, it never gets lost in that cluttered utensil drawer.
Installing one of these frees up valuable drawer space and gives you a reliable tool that’s always ready to go. Just mount it on a sturdy wall stud at chest height for the best leverage. A quick wipe of the blade after use will keep it sharp and rust-free for years to come.
3. The Cookie Press
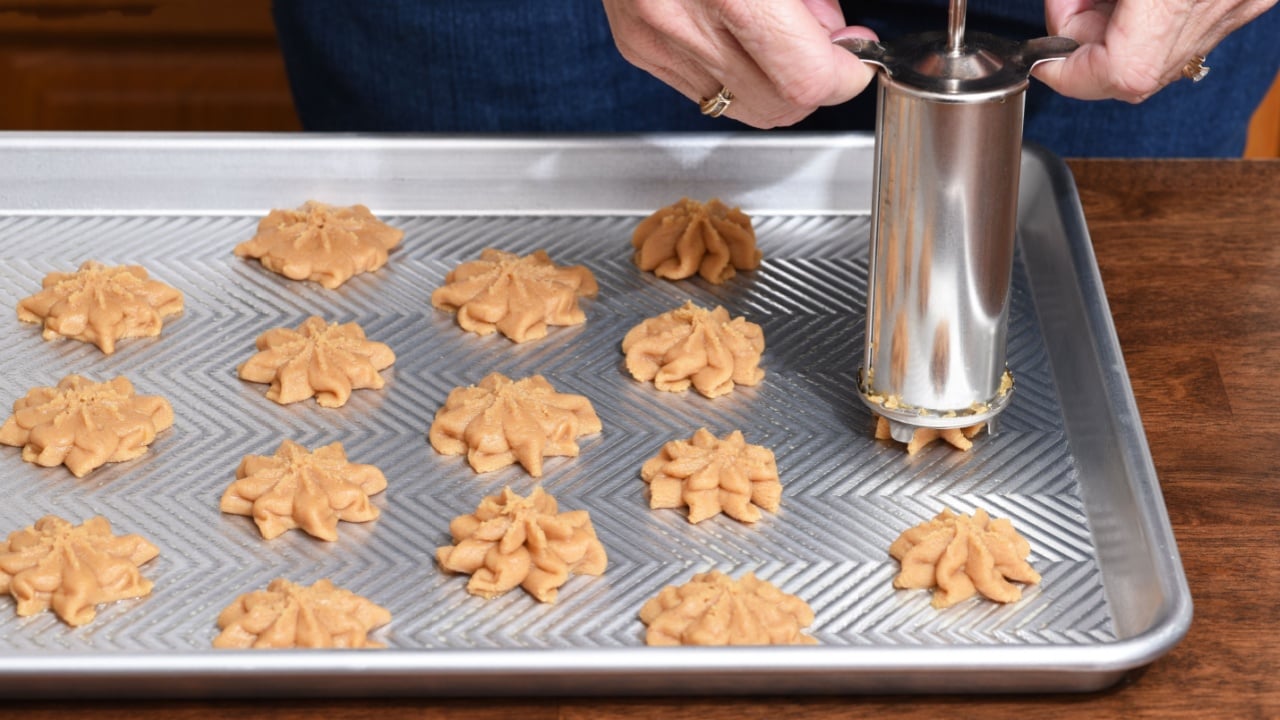
Image Credit: Shutterstock.
The cookie press is like a caulking gun, but for dough! Popularized in the 1960s, this tool lets you push buttery dough through decorative discs to create perfectly uniform spritz cookies in seconds. It holds a big batch of dough, so you can just pull the trigger and dispense flawless shapes one after another.
Think about how long it takes to roll and cut holiday cookies by hand. A press can be up to three times faster! And because every cookie is the same size, they all bake evenly. It’s a level of consistency that’s tough to get with a rolling pin and cookie cutters.
To keep your press in top shape, store the metal discs on a safety pin so they don’t get lost. For the most defined cookie shapes, chill the metal barrel in the fridge before loading it with dough. Always hand-wash the aluminum parts to keep them from discoloring and ensure the mechanism stays smooth.
4. Bedside Teasmades
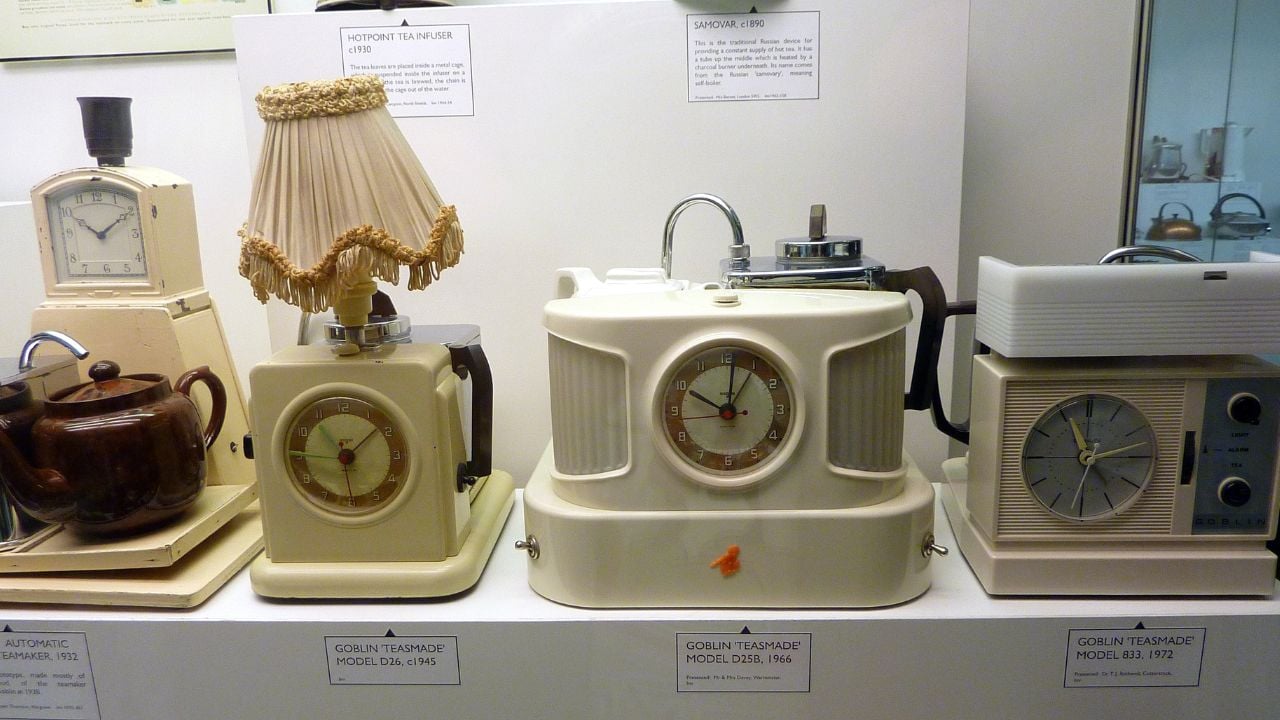
Image Credit: Original photo: Cory Doctorow on FlickrModified by Gazebo on June 28, 2014 – Teasmades, Science Museum, South Kensington, London, UK – CC BY-SA 2.0/Wiki Commons.
A quirky British invention from the 1930s, the Teasmade is part alarm clock, part automatic tea brewer. You set it on your bedside table, and just before your alarm goes off, it starts boiling water. The hot water then flows into a waiting teapot, so you wake up to a fresh brew and a ringing alarm.
Waking up to gentle sounds and smells, like boiling water and fresh tea, can actually make you feel less groggy in the morning. Millions of British households used to rely on these gadgets. While modern coffee makers have a similar idea, nothing beats the convenience of having a hot cup of tea waiting for you right by your bed.
Using a vintage Teasmade is simple: just fill the water reservoir and put a tea bag in the pot before bed. Use filtered water to prevent mineral buildup, and run a cleaning cycle with vinegar every few months to keep the internal tubing clear.
5. Multi-Tine Foley Forks
Image Credit: Bezbod at Shutterstock.
The Foley fork is a cool, six-tined utensil that’s a mash-up of a whisk, slotted spoon, and potato masher. Introduced in the 1930s, its wide, flat tines are angled just right, letting you mix dry ingredients or mash soft veggies with total ease. It’s a surprisingly versatile tool.
Mid-century celebrity chefs loved the Foley fork for cutting butter into pastry dough flawlessly. The angled head is also great for reducing wrist strain during heavy mixing. And because it’s made of thick steel, the tines won’t bend like they often do on modern wire mashers.
You can often find authentic Foley forks in antique shops, and they’re still tough enough for daily use. Try using one to scramble eggs right in the skillet. The wide tines are great for scraping the bottom of the pan. Just be sure to wash it right after mashing potatoes to keep starch from hardening between the tines.
6. Wooden Butter Churns
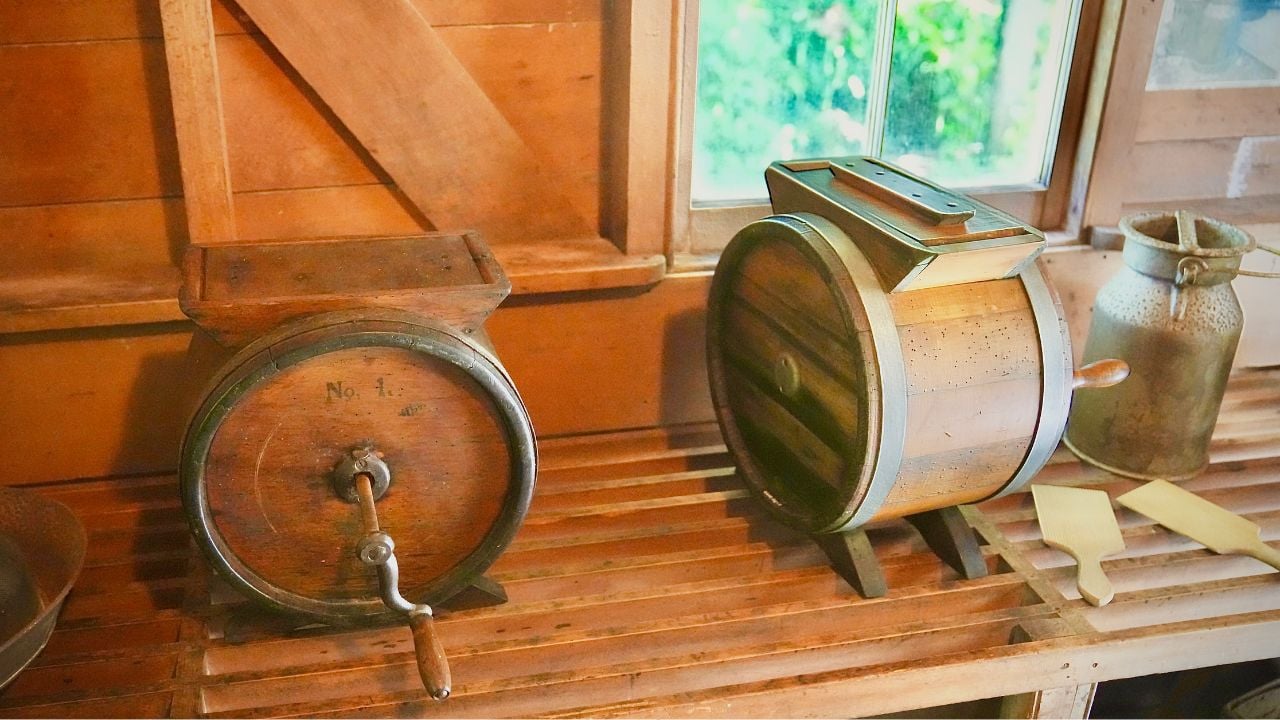
Image Credit: Richard N Horne – Own work – CC BY-SA 4.0/Wiki Commons.
Before butter came in sticks from the store, people made it at home with wooden butter churns. These consist of a barrel and a paddle for agitating cream. By plunging the paddle for hours, the fat molecules in the cream bind together, separating solid butter from liquid buttermilk.
Homemade butter from a churn has a much higher fat content than what you find in most supermarkets, which is why professional bakers prize it for creating flaky croissants and pie crusts. The leftover buttermilk is also amazing for making pancakes, as its acidity activates baking soda perfectly.
You can recreate this rich dairy product at home by getting heavy cream from a local farm. Just churn it vigorously until you see solid masses form. Rinse the fresh butter in ice water to remove any leftover buttermilk, and it will last much longer in the fridge.
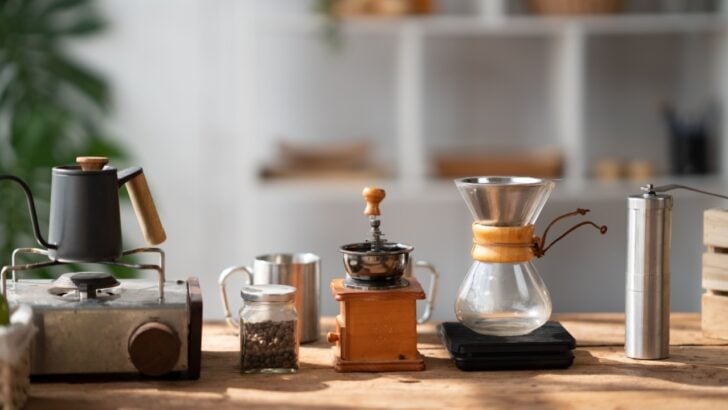
7. Stovetop Percolators

Image Credit: Shutterstock.
A stovetop percolator brews coffee using a simple, cyclical heating process, no paper filters or electronics needed. As the water boils, it travels up a central tube and cascades over a basket of coarse coffee grounds. This cycle continues as long as it’s on the heat, extracting a deep, robust flavor.
Percolators are still the top choice for campers who are off the grid, thanks to their durable stainless steel or enamel construction that can handle a direct flame. Coffee lovers also appreciate the high brewing temperature, which produces a much hotter cup than your average drip machine.
You can get the perfect brew by watching the color of the bubbling liquid through the clear glass knob on the lid. Once it reaches a dark amber, take it off the heat to avoid a bitter taste. Cleaning the basket and stem after each use is key to preventing old coffee oils from ruining your next pot.
8. Conveyor Belt Toast-O-Lators
Image Credit: Shutterstock.
The Toast-O-Lator was a breakfast game-changer in the late 1930s. It works like a little conveyor belt for your bread, moving it through a heated tunnel. You drop a slice in one end, it gets toasted as it travels, and then it drops out the other side onto your plate.
What made the Toast-O-Lator so great was its ability to toast bread perfectly evenly, something early pop-up toasters struggled with. The constant motion ensured every part of the bread got the same amount of heat. Plus, a small glass window lets you watch the magic happen, adding a bit of fun to your morning routine.
You can control the toastiness by adjusting the speed of the conveyor belt. Standard sandwich bread works best to prevent jams. Just remember to empty the crumb tray regularly to avoid a fire hazard and keep the gears running smoothly.
9. Hand-Cranked Coffee Mills
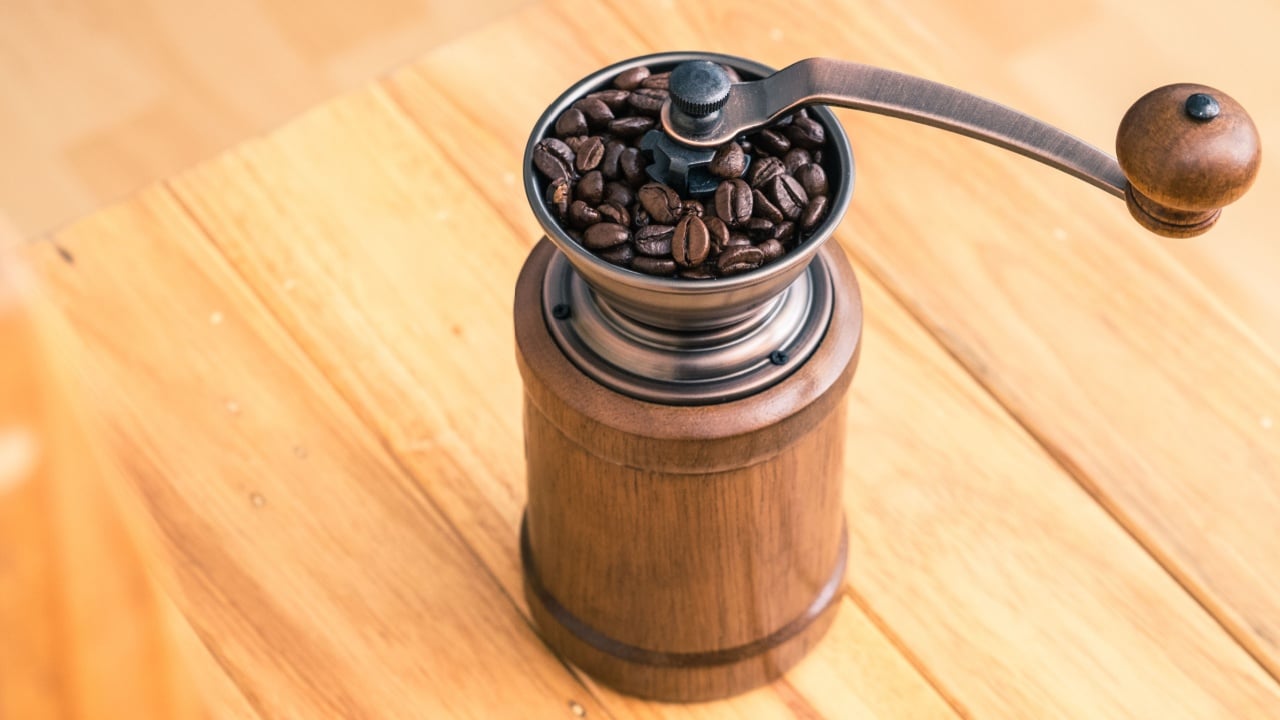
Image Credit: Shutterstock.
Before electric grinders, there were hand-cranked coffee mills. These devices, patented in the 18th century, feature a hopper on top, an adjustable grinding burr, and a little drawer to catch the grounds. As you turn the handle, beans are crushed between metal or ceramic burrs into a consistent powder.
Coffee experts agree that burr grinding is far superior to blade grinding for flavor. Blade grinders chop beans unevenly and create heat, while hand mills crush them gently at a low temperature. This results in uniform grounds, which is key for a balanced brew.
You can adjust the coarseness by twisting an internal screw, whether you need a fine powder for espresso or coarse chunks for a French press. Grinding just enough beans for one pot keeps the flavor fresh. To clean it, just use a dry brush to remove old grounds without causing rust.
10. Cast Iron Meat Grinders
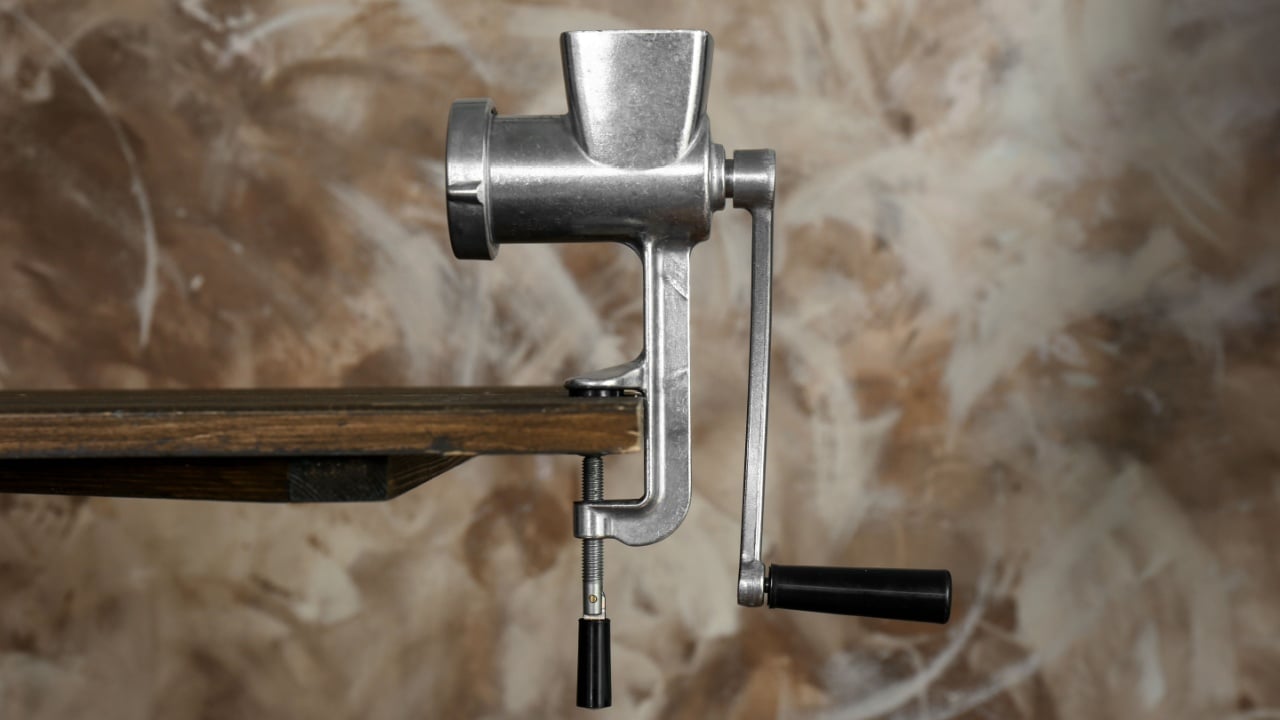
Image Credit: Shutterstock.
This rugged 19th-century tool clamps onto your counter and uses a hand-cranked auger to push meat through a perforated plate. It allowed butchers and home cooks to turn cheap, tough cuts of meat into tender ground mixtures. The heavy cast iron construction has enough power to crush through cartilage and small bones with ease.
Grinding your own meat gives you total control over the fat content and quality. Commercially ground beef can contain meat from hundreds of different animals, increasing contamination risks. Grinding a single cut of chuck roast yourself results in a safer and way more flavorful burger.
For the best results, chill the metal grinder parts and the meat in the freezer for about 30 minutes to keep the fat from melting. Alternate feeding chunks of lean meat and fat into the hopper for a balanced mix. After washing, coat the cast-iron parts with mineral oil to prevent rust.
11. Mechanical Kitchen Scales
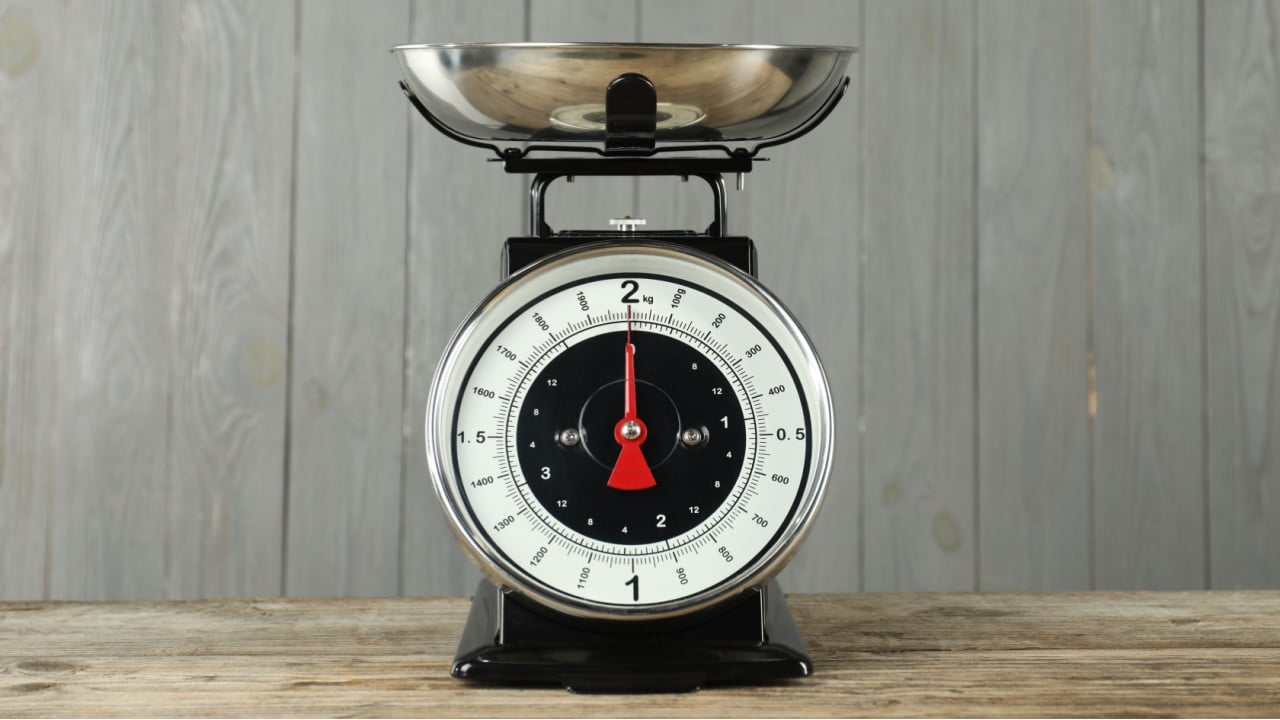
Image Credit: Shutterstock.
Mechanical kitchen scales use springs and balances to weigh ingredients. They typically have a bowl on top of a base with a numerical dial. When you put food in the bowl, it compresses a spring, and the needle moves to show the weight.
Professional bakers swear by weight measurements over volume for consistent results, especially in bread and pastries. Digital scales can be frustrating when they turn off mid-recipe to save batteries. Mechanical scales stay on and are always ready when you need them.
Calibrating a mechanical scale is easy; just turn a small knob to set the needle to zero. You can place parchment paper in the bowl to make transferring dry ingredients less messy. Storing the scale away from heat will preserve the spring’s tension and keep it accurate for years.
12. Manual Food Mills
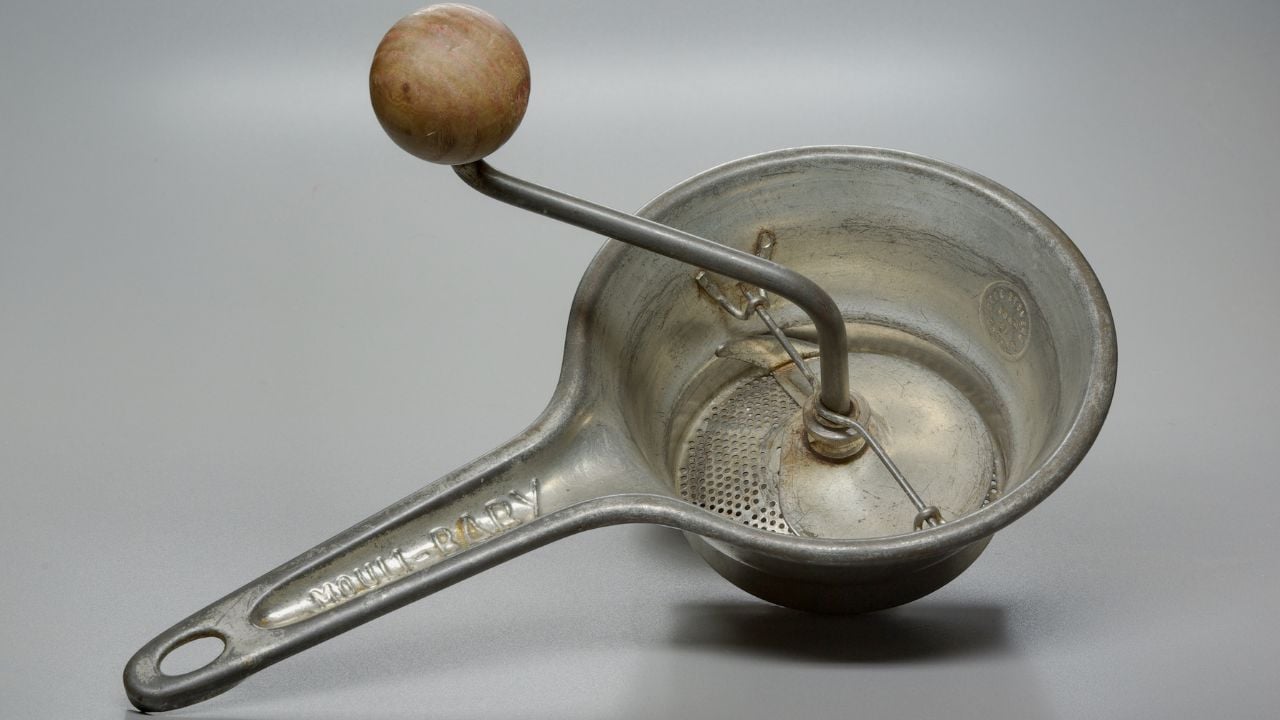
Image Credit: Berthold Werner – Own work – CC BY-SA 3.0/Wiki Commons.
Often called a mouli, the manual food mill is a bowl with a perforated bottom and a hand-cranked blade. You put cooked fruits or veggies in the bowl and turn the handle to press the food through the holes. This purees the soft parts while leaving behind skins, seeds, and stems.
This is the same basic technology used to make commercial baby food. Food mills are also fantastic for making fluffy mashed potatoes because they aerate them better than an electric processor, which can make them gluey. Plus, you don’t have to peel tomatoes before making a fresh pasta sauce.
You can swap out the perforated plates to get a fine, medium, or coarse texture. For a super smooth puree, boil your veggies until they’re fork-tender, making the cranking process a breeze. Rinsing the plates right after use will prevent fruit acids from damaging the metal.
13. Stovetop Waffle Irons
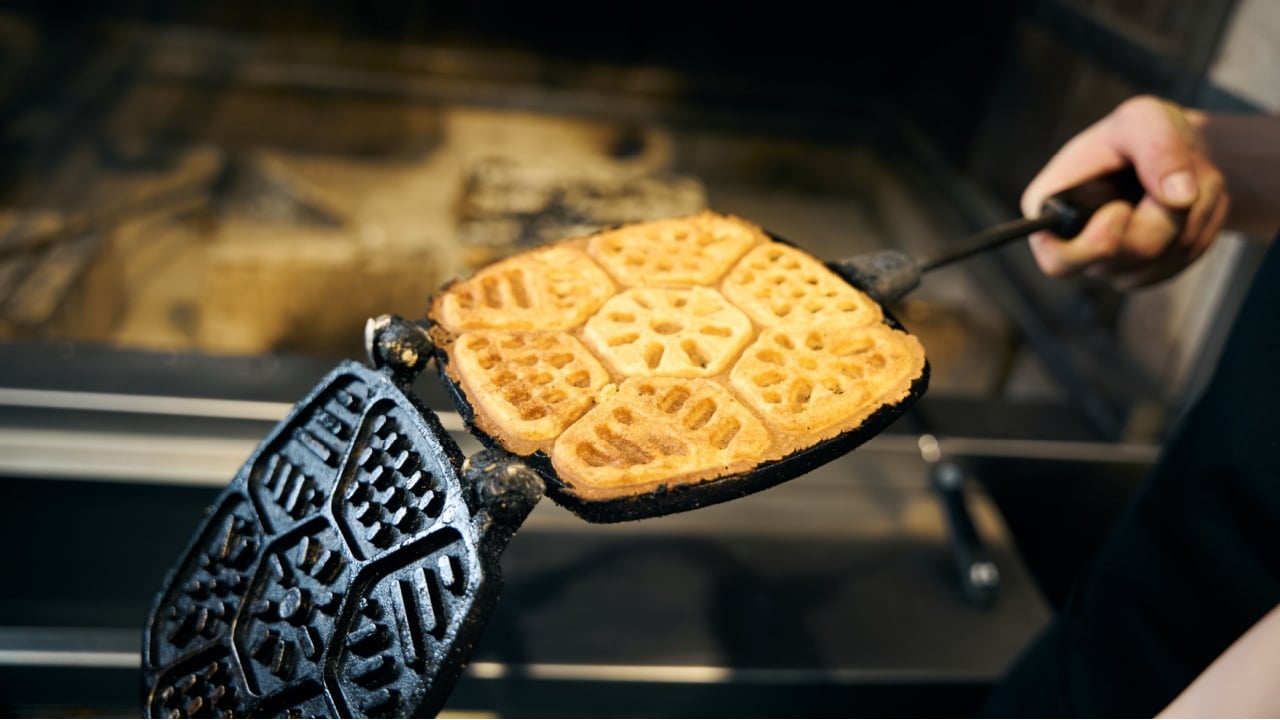
Image Credit: Shutterstock.
Cast iron stovetop waffle irons are made of two hinged, gridded plates with a long handle. You place the iron directly on a gas or electric stove and flip it manually to cook both sides. The heavy cast iron gets incredibly hot, which is the secret to a perfect waffle.
These old-school irons are prized for making waffles with a super crunchy outside and a soft, steamy inside. Most modern electric waffle makers just don’t get hot enough to create that amazing textural contrast. And since there are no electronics, a cast-iron waffle maker can last for generations.
To prevent sticking, preheat both sides of the iron thoroughly before adding batter. A thin coat of oil between batches will maintain the non-stick seasoning. Clean it with hot water and a brush, never soap to preserve the seasoned finish.
14. Hand-Cranked Ice Cream Makers
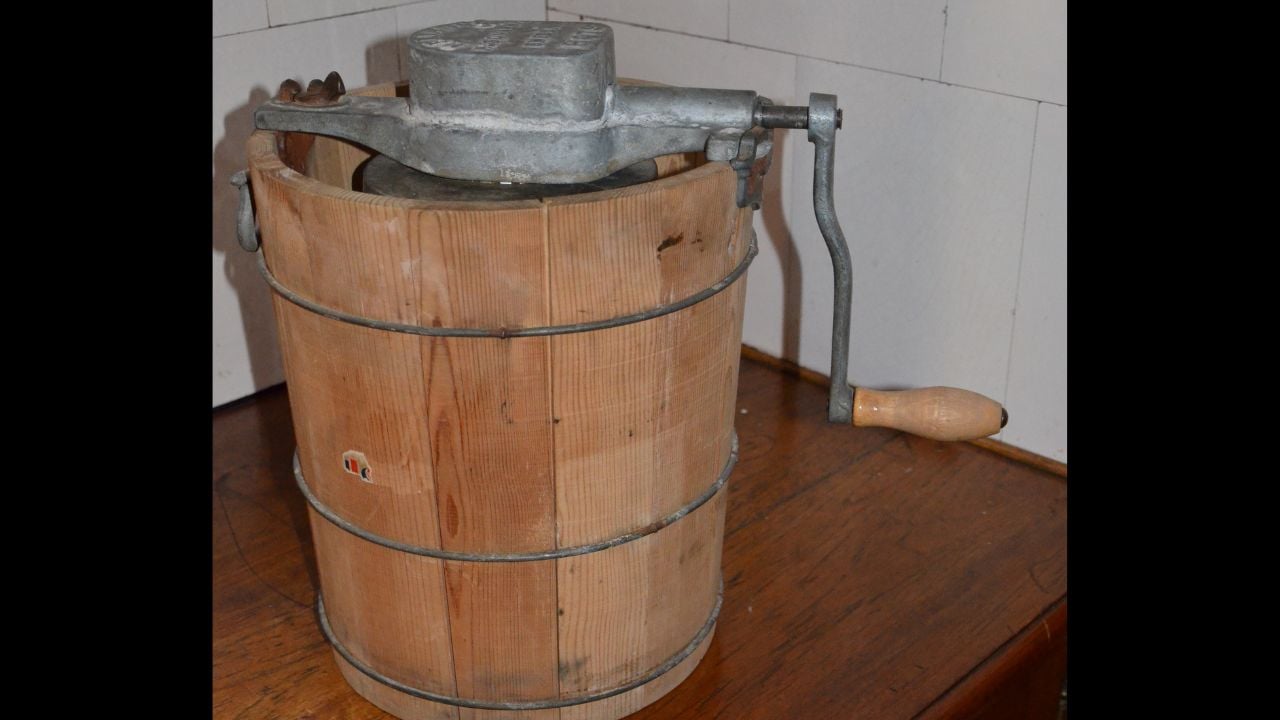
Image Credit: Bengt Oberger – Own work – CC BY-SA 3.0/Wiki Commons.
The vintage hand-cranked ice cream maker has a metal canister that sits in a wooden bucket filled with ice and rock salt. You pour your custard base into the canister and turn a handle to rotate paddles that scrape the inside walls. The salt makes the ice super cold, rapidly freezing the custard.
The secret to creamy, non-icy frozen desserts is constant, vigorous churning, which this machine forces you to do. The manual cranking also incorporates just the right amount of air, creating a denser, richer ice cream than many commercial brands. Plus, it’s a fun, hands-on way to see your dessert transform.
For faster freezing, use a lot of rock salt with your ice. Wrapping the wooden bucket in a towel will help insulate it and keep things cold. Once churned, transfer the ice cream to an airtight container and pop it in the freezer to harden to a perfect, scoopable consistency.
Old School is the New Cool

Image Credit: Shutterstock.
Bringing these vintage kitchen tools back into your daily routine is an instant culinary upgrade. You can find these sturdy gadgets at local antique shops or online marketplaces. Clean them up, put them to work, and enjoy the satisfaction of hands-on cooking.